The big security news this past week was the SSL Renegotiation Flaw found by researchers Marsh Ray and Steve Dispensa at Phone Factor. Here is what they say :
The SSL authentication gap allows an attacker to mount a man-in-the-middle attack, and affects the majority of SSL-protected servers on the Internet. Specifically, the vulnerability allows the attacker to inject malicious data and commands into the authenticated SSL communications path. This can often be done without either the client or server (e.g. web server and browser) being able to detect the attack.
Read more at their site
Listen to an interview featuring Marsh Ray
What is really cool with this vulnerability is that the researchers have released packet captures of it in action.
Grab the packet captures, a whitepaper, and protocol diagrams from Phone Factor’s site.
Analyzing the packet captures
In this post,let us see how we can analyze these and similar packet captures. There is plenty of heavy lifting to be done, so we will be breaking open a tool called Unsniff. Laura Chappell over at Chappell Seminars has a similar post on analyzing the traces using Wireshark.
Among all the captures released, client_init_renego_bis.pcap seems to demonstrate the attack the best. To make this exercise easy we first decrypt the capture file using Unsniff’s TLS decryption capabilities and save it in Unsniff’s native USNF format.
The USNF format
The USNF format is a great way to share decrypted SSL/TLS packet captures without supplying the private key. No, the private key is not secretly tucked away in the file. It is simply not required after the initial decryption.
Step 1 : Download the latest version of Unsniff
Step 2 : Download the capture file in USNF format from here
Step 3 : Open the file and play with the Packets, PDU, and Sessions tabs.
- Packets : A list of link layer packets like you would see with Wireshark.
- Sessions : A list of TCP streams.
- PDUs : A list of reassembled and decrypted SSL records.
The Packets tab is not very interesting here because SSL records bear no relationship to link layer packet boundaries. So lets focus on the PDU and Sessions tabs.
Analyzing the streams
Switch to the sessions tab and note that the Sessions tab shows 6 TCP streams. But the original pcap file contained only 2 streams (from victim to MITM and from MITM to server). Unsniff creates two extra streams for every SSL/TLS stream. This is an great way to strip and analyze encrypted or tunneled streams.
The two extra streams are :
- The decrypted SSL stream (with all the handshakes in it. Decrypted but with signature and block cipher padding intact)
- The decrypted upper layer HTTP stream (with only the application data)
View HTTP data from the perspective of Server and MITM
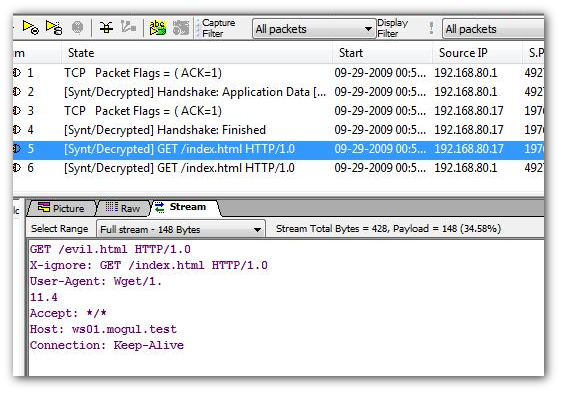
Lets first look at the HTTP data from the HTTP server’s perspective.
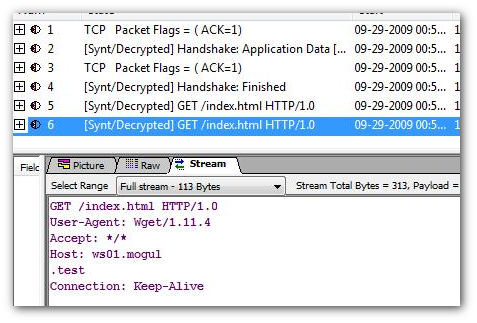
Move to the Sessions tab and make sure the Stream sheet is activated. You may also have to rt-click and switch to UTF-8.
- Click on Stream 5 ( HTTP data as seen by the server)
- Click on Stream 6 (HTTP data sent by the victim)
Going deeper with the Bounce View
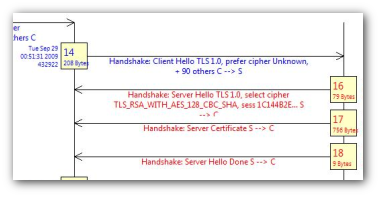
The real juicy part is ofcourse the protocol exchanges between the victim, the MITM, and the server. The ideal tool for this is called the “PDU Bouncer’. Activate it by Right-Clicking on a PDU and selecting Bounce View. This creates a bounce diagram containing all the PDUs that went back and forth on the same TCP stream in time order. For example : Right click on PDU #2 to bring up the diagram shown on the right.
Three-way Bounce
What is really cool about this bounce diagram is that you can select two PDUs from different streams and you will then get a three-way (or even 4 way diagrams).
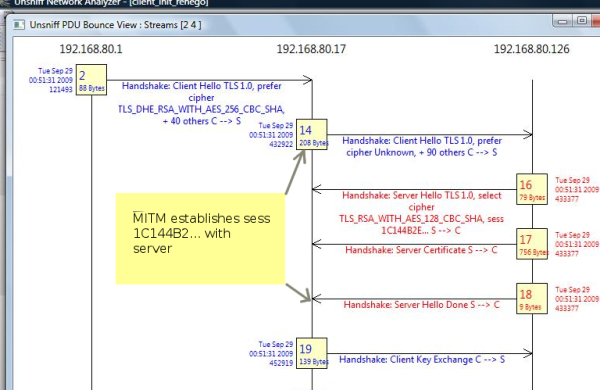
This is exactly what we need, the victim, the MITM, and the server PDUs all laid out in a protocol diagram. Switch to the PDU view, right click and select PDUs 2 and 14. Now bring up the PDU bouncer.
Lets see what we get.
Stage 1
Shows the MITM (192.168.80.17) intercepting the Client Hello from the victim and then establishing a separate connection to the server with the intention of patching on the client later. The session ID can be seen to be 1C144B..
Stage 2
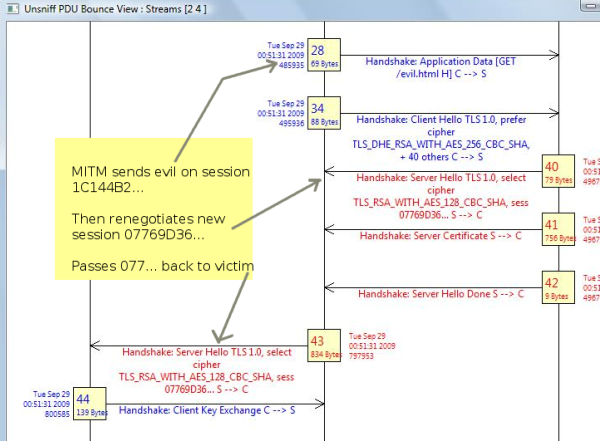
This shows the MITM sending the evil payload (PDU#28). Note the evil payload is an incomplete HTTP request sent with the hope that the victim will complete it. Once the payload is sent, you can see a new session being renegotiated. This new session is passed on to the client, from which point on the MITM stays away. The damage having been done ! Pure evil.
You can generate a PDF for any bounce diagram via Right Click + Print + Select CutePDF.
The PDF for this diagram is available here.
Tailpiece
The authors themselves have a pretty comprehensive whitepaper including a protocol diagram of their own in the package (http://www.phonefactor.com/sslgap/). The purpose of this post is to introduce a new tool you may wish to consider adding to your security toolbox in addition to the ubiquitous and lovable Wireshark.
Unsniff Network Analyzer 2.0 also features remote analysis in line with the NSM principles advocated in the Tao of Network Security Monitoring book. You can download the latest beta builds as they become available from http://www.unleashnetworks.com/downloads. Please support the product by testing out the beta builds.
